DMelt:General/9 Advanced Usage
Working with pure Jython project
To start a project, click on the button indicating your current directory (it is located in the bottom of DataMelt IDE, on the left part of the status bar). Select some directory and populate it with some Jython files. Each file should contain the line:
>>> os.path.append(ProjDir)
This will add the project directory to the system path of Jython. You can check this by putting the line "print sys.path" which will print the system path. Execute the scripts by clicking to the run button.
Pure Java project
In case of a pure Java project, use the example located in "macros/examples/proj". Click on the project button (bottom of DataMelt IDE, left part of the status bar) and select the directory "macros/examples/proj" using a directory browser. The open the main class "example\_java.java" (double click with the mouse button). This is a simple Java program which calls the external library located in the "example2" directory ("Calc.java").
First, build Java library files located inside the "macros/examples/proj/example*" directories. To do this, select "compile and jar project files" from the "run" menu. After executing it, a jar file "classes.jar" will appear in the main project directory, which contains all the classes build from the source files located in the project library directories.
If "example_java.java" is already opened in the DataMelt IDE, press "run" (or "Run java" from the menu "run"). You will see the output from the class {\tt Calc} in the BeanShell.
You can further adjust the class path of external libraries by modifying the BeanShell scrips in "macros/user/run\_java*" files.
Mixing Jython with Java
One can mix Jython and Java codes for CPU extensive tasks, like large loops over primitive data types, reading large files etc.. Such CPU extensive tasks must be implemented in Java. In this case, it is assumed that Jython scripts are used as a glue for various Java libraries with the source files located in directories of the main project directory.
First, build a jar file which contains the byte-codes of Java classes. Again, for this example, set "macros/examples/proj" as your project directory and select "compile and jar project files" from the "run" tool-bar menu. After executing it, a jar file "classes.jar" appears in the main project directory, which contains the classes of the source files located in the project directory.
Then open a glue Jython script "example_java.py". This script calls the class "Calc" and prints its output. Then execute this Jython script by clicking on the "run" button on the tool bar. You will see the output from the "Calc" class located in "example2/Calc.java".
You can modify the file "example2/Calc.java" and recompile the all project again using the option "javac all files" from the "run" menu. One can also rebuild the jar library. Note that to trigger changes, you will need to reload BeanShell console using the small reload button on the BeanShell tab. Then run the "example_java.py" again. You should see a different output from the class "Calc".
DMelt structure
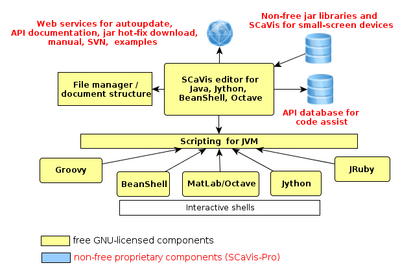
Many components of DataMelt are free. But many services (including the full access to this manual) and jar components are only accessible for full members. This diagram shows DataMelt's structure, where yellow components show GNU-licensed parts of the program.
If you are non-member, you will see yellow boxes such as this:
You are not full member and have a limited access to this section. You can unlock this part after becoming a full member.
(this can only seen by non-member) which protects some information and example codes. Users with the member privileges do not see such yellow boxes.

